Showing posts with label makeup. Show all posts

Thursday, February 23, 2012

Uses of MAKEUP BRUSHES for FACE makeup

Uses of MAKEUP BRUSHES for FACE makeup


My last post was about how to use makeup brushes for Eye makeup.Here s my new post on the uses of different makeup brushes for Facr makeup.


1.Foundation Brush:


This brushes are mainly used to apply liquid foundation.The brush is flat on both sides.This is how the brush looks :


How to use :

-Pour a small amount of foundation on the hand.
-Dip the brush the tip in the foundation.
-Make some dots of foundation on face.
-Now use the side of the brush to blend the foundation.
-Use broad, downward strokes to sweep and blend the makeup onto the nose, forehead, cheeks and chin.


This picture might help :


2.Concealer brush:

This brush is used to apply the concealer,helps to hide fine lines around eyes or anywhere on the face.The imperfect areas of face can be corrected by using this brush.
Heres how the brush looks :


This is how it is used to blend the concealer.

this is how it is used :


3.Bronzer Brush :

It is used to dust Bronzer on face to enhance the skin complexion & glow.
This is how the brush looks :
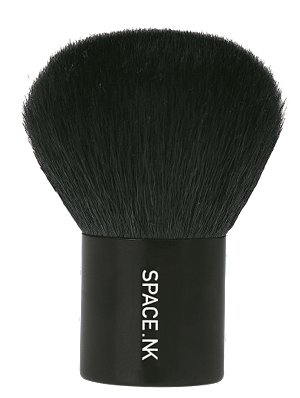

You can use this brush for applying bronzer in the right way.Heres the post for how to apply bronzer.

4.Blush Brush :

Heres 2 types of brushes are used widely.
One is almost like the bronzer brush :

another type is angled blush brush.I feel this brush is more helpful to apply blush on cheeks.


5.Lip brush :
This brush has a small & sharp tip.We all know about this brushes.Heres the view 


6.Highlighter Brush :

This type of brushes has many uses like - applying a small amount of blush to the cheeks,highlighting the top of the cheekbones,also used for applying bronzer & blush as well.
This is how the brush looks :


7.Kabuki Brush :

This brush has a short tail.The fibre are made really soft.This brush exactly looks like bronzer brush .It is used for applying blush,highlighting,bronzing etc.I use it for dusting off excess powder.It s also useful for applying mineral makeup.
This is how the brush looks :


These are the main types of makeup brushes.There are also other varieties.Suit yourself with your favourite ones.
The proper use of brushes makes your makeup looks more perfect & natural.Celebrity Makeup artist like LAURA
Mercier also suggests for using makeup brushes for makeup, not hands.


Thursday, February 16, 2012

Uses of different MAKEUP BRUSHES for EYE MAKEUP

Uses of different MAKEUP BRUSHES for EYE MAKEUP


Before seeing the brushes,you should check this post to know the names of eye areas.
http://makeup-hookers.blogspot.com/2011/12/map-of-eye-for-eyemakeup.html

1.Eye shadow sponge applicator:


This is the most common makeup tool.Comes with the eyeshadow pallettes.Also available in different shapes.This sponge is used to apply the shadow just the upper lid.Its very difficult to shape up the ey shadow by this sponge applicator.


2.Eye shadow brush:


These brushes are also famous for eye shadow application.The brushes are useful to apply the eye shadow in a smooth manner on the upper lids.These types of brushes gives smoother eye look than the sponge applicator i mentioned before.

3.
Eyeshadow Crease/Pencil Brush :


These brushes are used to apply eye shadow in your creas ( area above your upper lid).See the following picture,pencil brush is used to apply the darker shade on the crease area.


These brushes give a precise & sharp application of shadows on the eye.If you use the sponge or eyeshadow brushes you might have undefined look on the lids.These brushes are domed shaped and tapered so that the brush can  fit into crease.


4.Eyeshadow Blending Brush :


Some expert do not use it.But these brushes are really helpful when you are applying different shades on eye.These brushes are used to blend the matchlines of 2 different eye shadows on the lid or brow bone.It also removes the harsh lines of eye areas.This type of brushes are not firm like eye shadow & pencil brushes.These brushes are made of soft hair.Some eye shadow pallettes supply 2 sided brush ,one side is the sponge applicator & the other side is the blending brush.

This is how it is used to blend the colours.


5. Smudge Brush :


Smudge brushes are typically flat and made of short hairs. These brushes are ideal for the following uses:
  • -Creating a rich, smoky eye.
  • -Lining and contouring the eye.
  • -Adding definition and depth to the eyelid
  • -Adding color and blending in the crease.

So the main use of this type of brushes are to create a natural look.See the picture a smudge brush is using for a smokey eye look

6. Angled Eyeshadow Shader  Brush :


This is a great tool to use for the soft line of eye shadow colour on the lower lashline. They are also ideal for adding eyeshadow to the outer-v .

7.Eyeliner Brush :


This brush har sharp soft tip which 
ensures precise, clean application of eye liner.This type of brushes are excellent for applying liquid or gel eye liner.

8.Mascara Fan Brush :


This type of brush provides clump-free, precise mascara application to the upper and lower lashes.


Tuesday, January 31, 2012

How to contour Nose

How to contour Nose


Makeup is not only limitted in sequential application.The makeup beauty also lies in shaping up the face.Shaping face or contouring is a tricky part of applying makeup,just a lit bit of practice can help to give a nice full look.


Why you need contouring ??


-To shape up nose,like wide nose will look thin.


Things needed : 
                         1. darker shade of foundation
                         2.lighter shade of foundation ( this is the foundation colour you are gonna use for rest of the face's base makeup)
                         3.darker shade of pressed powder.
                         4.lighter shade of pressed powder( this is the face powder you will apply all over the face)
                         5.A angled makeup brush.
                         6.Makeup sponge
                         or 
you can buy Contouring kit which contain different types of cream foundation in a kit.In bangladesh its not available ,you will have to contour by foundation.


How to slim down a wide nose / contouring nose :


1. the basic principle of this use a lighter shade foundation on the bridge of your nose & darker shades on the side of the bridge of your nose.


2. see the picture :


3.Begin by applying the darker shade of foundation on either side of the bridge of your nose with the makeup brush.


4.Using the makeup brush, extend down each side of your nose, starting from the eyebrow and ending at the side of the nostril.


5.Create a line of dark color down each side of your nose. Blend outward towards your cheek, under the eye, and around your nostril to make it look as natural as possible.


6.Apply a thin line of the lighter shade of foundation down the bridge of your nose with the makeup brush. Begin between your eyebrows and extend all the way down to the tip of your nose.

7.Softly brush the lighter color towards the contoured, darker sides of your nose to prevent any sharp lines. However, be careful not to lighten the contoured areas.

8.The bridge of your nose is the area that gets hit by light first, and, therefore, applying a lighter shade of foundation will draw attention to the slimmer part of your nose.

9.Apply the darker face powder to give smooth finish.

10.Then apply the lighter pressed powder all over the face leaving lines of contoured area.

11.Use a brush to match down the dark & light matching lines of makeup.

12.Blending is the key.Blend untill you get a smooth & natural finish.


Monday, January 30, 2012

All about foundation : How To Apply Liquid Foundation - Part 3

All about foundation : How To Apply Liquid Foundation - Part 3


A perfect & smooth base is very much needed for a flawless make up. Take a good amount of time for applying foundation.Make your base perfect otherwise your rest of the makeup will be a mess. 


How to apply liquid foundation : 


Things needed : foam/Sponge or a dense,flat top brush( i use Sigma F80), tissue,liquid foundation.


How to :( by sponge)


1.clean your face well & apply a good moisturizer.( use johnson baby cream a very good moisturizing base for makeup).You can also apply sunblock/suncreen for a day makeup over it.


2.First caution,do not use fingers for foundation application if you are not expert enough.This is the mistake most woman make & they got a uneven finish of foundation.


3.take a makeup sponge.Like this


You may also find sponges of other shapes & sizes,suit yourself with the right sponge.


4.Before applying foundation , slightly damp the sponge by water.


5.Take a little amount on your finger.Put little little dots on all over the face.Like this 


(please do not try to blend by finger).


6.Take the dammped sponge & start blending in a motion ( like horizontally outward or horizontally inward motion, from cheek to ear or from ear to cheek).Use the sponge for blending like this 


7.First blend the nose area vertically.& then the cheek area.Last blend the chin & forehead areas.See the picture below.The picture best describe the right motion of application.


8.For the finishing touch , blend the foundation around the eye area,& the edge area of your face.


9.Take a tissue, press it on face very carefully & soak out the excess foundation.


How to apply liquid foundation ( by brush) :


1.Use a flat topped densed brush for foundation application.


2.Like this 


3.take a small amount of foundation on your wrist & lightly dip the brush in it.


4.Now pat the brush on face starting from your cheeks.


5.Here the best way of application is in a circular motion.


6.Move bristles of brush all over face untill you get a smooth & even finish.


7.The best benefit of this method is , after application there wont be any excess foundation on face.


There's also a 2 sided flat foundation brush like this


This is how it is used ( i do not prefer this brush as this type of brush can't give a smooth finish):


How to use Foundation Brush :


-Pour a small amount of foundation on the hand.
-Dip the brush the tip in the foundation.
-Make some dots of foundation on face.
-Now use the side of the brush to blend the foundation.
-Use broad, downward strokes to sweep and blend the makeup onto the nose, forehead, cheeks and chin.


Some additional tips :

-the tutorials are given based on internet & personal experience.This is the ways most women feel suitable for foundation application.But every person has a different way of comfort.Its better , find your own way of application.Choose brush or sponge which gives a perfect finish.

-While applying foundation,find your own way of starting.Its not mandatory to start from nose area.Its the basic & most common way of foundation appplication.

-Do not forget to apply pressed powder over liquid foundation.

-Not to forget other beauty essentials like lipcolor eye makeup etc.

-Liquid foundation finish will definitely alter skin color.It is its property.You will never get a perfect matching skin colour with liquid foundation,especially for medium skin tonned girls.So application of other makeup essentials is necessary when you apply a liquid fioundation.For fair skinned ladies like blondes , sometimes pressed powder is not necessary.But for Bangladeshi girls skin tone ,pressed powder finish is very much necessary.

-Dont worry about foundation color.As i mentioned in previous post , chooose the one which best tends to your skin.

Liquid foundation is the most common & widely used.Hope i have covered all the info s here.take care <3

Thursday, January 5, 2012

Makeup tips according to face shape: What is the goal of makeup with face shape

Makeup tips according to face shape: What is the goal of makeup with face shape??

1.Round face shape :


If you have a round face,  
-the goal is to try and make it appear slimmer.
-You can slim your face by contouring.The contouring means adding a darker shade of foundation or bronzer to the cheeks and side of your face will slim the round shape.
Applying lighter foundation to the forehead will help lengthen your shape.
-Define your eyes by choosing darker shades such as deep browns and plums.

2.Oval face shape :


-In this face shape the cheekbones seem flat.
-The goal is to Prominate the cheekbones .
-Use a lighter foundation for areas such as the lower part of your forehead, around your nose, and around the eyes. As a result, your cheekbones will be accentuated more.


3.Diamond face shape :


-With this particular face shape, the cheekbone is the widest area.
-So the goal of the diamond face shape is to make the cheek area appear less wide.
-When putting on makeup, try to bring attention to the chin and forehead area.-
Put a darker shade of foundation on the jaw line and the lighter under the eyes.
-As far as the lips go, use pale toned lipsticks to create a wider look.

4.Heart face shape :


-If you have a heart shaped face, the width of your face will be at the forehead and cheek area.
-Your chin will be the narrow point of your head.
-When applying makeup, the goal is to create an oval face shape.
-This can be achieved with pressed powder or liquid foundation.
-The main point of attraction for the heart-shaped face is the eyes. Let your eyes stand out to draw attention away from the chin area. Try using dark eyeliner to create a dramatic look around your eyes.

5.Long face shape :


-The goal of this face shape is to appear shorter and wider.
-This type of face shape is longer than it is wide, and makeup can be used to give it a more oval-like shape. -Highlight areas like the chin and the forehead with a darker shade of foundation.
-Choose blush that is more neutral in color.
-When applying, use horizontal strokes instead of vertical sweeps.

6.Square face shape :


-The goal of this face shape is to decrease the overall square, and to appear to have an oval face. 
-Draw a mental picture of an oval shape on your face while looking in the mirror. 
-Once you have that image, using a darker shade of foundation, apply in all of the areas outside of the oval. -Use the lighter shade of foundation underneath the eyes and in the middle of the forehead.


Friday, December 23, 2011

Map of eye for Eyemakeup

                                        Map of eye for Eyemakeup


While going through various eye makeup tutorial we come up with various words.Here s some tips , after reading this you will never get confused with those words & instructions :


-For the lid section, it refers to the entire lid area colored in light pink (it can also extend to the outer V area). 
-The sections labeled upper lashlinewaterline, and lower lashline are areas where you can line your eye with an eye pencil, gel liner, or even eye shadow.
-The inner corner and tear duct are great places to put a white shimmery color to brighten up the eyes.
-The brow bone is to highlight .
-Outer V is to smoke up your eyes.

Hope this map is gonna help you to do eye makeup with more confidence.


Rocking Red Lips

                                                    Rocking Red Lips


Red lipcolor is a classic trend of makeup . It has been in vogue since its beginning and shows no signs of retiring yet.There are many new fashion trends of makeup like nude lip color etc.But women in red lips are always sensual.
Its not necessary that you will have to be fair skinned for putting red lipcolor.I believe red is the only color that goes perfect with all skin type & texture.You just need to find out the right red color.


Look at the following picture.Red is admiring all the skin tone.


Red lipcolor family :


Red lipcolor for different tones:


How to choose perfect red lipstick?


First of all , Apply the red lipstick on your upper lip. Now look into a mirror. If the shade of red is darker than your lower lip, it will suit you well. If not, then this red is not for your skin tone.


Various colors for various skin tone :


Fair skinned ladies should look for- blue-based reds like plums, berry, crimson or cherry instead of shocking red. Some picture so that you can find the right one for you.
A plum red color :


A berry red lip color :
A crimson red color it tends to tomato red almost :

A cherry red color :
taylor swift wearing cherry red lipstick at vma :

True reds like scarlett, cherry will pop up beautifully against medium complexion. Try to stay away from orange-based reds as it will make you look too pale.
A scarlett red :

Dark-skinned women should go for warmer and deeper shades of red like burgundy, brick, cranberry, sangria, garnet etc. Gold-based and orange-based reds will also go great with dark skin.
A burgandy is not perfectly red but it is included 
in red lip color family :
Jennifer hudson wearing burgandy lip color:

A Brick red color on rihanna :

A cranberry red very close to brick red :
(following 2 pictures)


A sangria red lip color :

A garnet red color :


How to put on red lipstick :

-Exfoliate your lips and then moisturize them well before using red.
-Apply foundation on your lips. This will make a smooth base for you to apply on the lipstick. Be sure to apply it also evenly on your face and around your lips.
-After the foundation has dried, outline your lips with a lipliner. Doing so will prevent your lipstick from bleeding at the edges. You wouldn't want to look like a clown when that happens. Also, make sure that the lipliner matches your lip color.
-The next steps involve the lipstick application. You must apply the lipstick twice so that the red color will last long. In the first application, you need to blot your lips after with a tissue. Then, re-apply the second layer to achieve that long-lasting effect. When you apply your lipstick, it is best to use a lipbrush. You must first apply the color to the center of your lips and then brush it toward the edges. 
-Pair your red lipstick with red nails .
-Keep the rest of the makeup natural and simple. Let your lips be the focus.

Hope you are gonna rock your lips by red.Good luck. <3