Thursday, February 16, 2012

Uses of different MAKEUP BRUSHES for EYE MAKEUP

Uses of different MAKEUP BRUSHES for EYE MAKEUP


Before seeing the brushes,you should check this post to know the names of eye areas.
http://makeup-hookers.blogspot.com/2011/12/map-of-eye-for-eyemakeup.html

1.Eye shadow sponge applicator:


This is the most common makeup tool.Comes with the eyeshadow pallettes.Also available in different shapes.This sponge is used to apply the shadow just the upper lid.Its very difficult to shape up the ey shadow by this sponge applicator.


2.Eye shadow brush:


These brushes are also famous for eye shadow application.The brushes are useful to apply the eye shadow in a smooth manner on the upper lids.These types of brushes gives smoother eye look than the sponge applicator i mentioned before.

3.
Eyeshadow Crease/Pencil Brush :


These brushes are used to apply eye shadow in your creas ( area above your upper lid).See the following picture,pencil brush is used to apply the darker shade on the crease area.


These brushes give a precise & sharp application of shadows on the eye.If you use the sponge or eyeshadow brushes you might have undefined look on the lids.These brushes are domed shaped and tapered so that the brush can  fit into crease.


4.Eyeshadow Blending Brush :


Some expert do not use it.But these brushes are really helpful when you are applying different shades on eye.These brushes are used to blend the matchlines of 2 different eye shadows on the lid or brow bone.It also removes the harsh lines of eye areas.This type of brushes are not firm like eye shadow & pencil brushes.These brushes are made of soft hair.Some eye shadow pallettes supply 2 sided brush ,one side is the sponge applicator & the other side is the blending brush.

This is how it is used to blend the colours.


5. Smudge Brush :


Smudge brushes are typically flat and made of short hairs. These brushes are ideal for the following uses:
  • -Creating a rich, smoky eye.
  • -Lining and contouring the eye.
  • -Adding definition and depth to the eyelid
  • -Adding color and blending in the crease.

So the main use of this type of brushes are to create a natural look.See the picture a smudge brush is using for a smokey eye look

6. Angled Eyeshadow Shader  Brush :


This is a great tool to use for the soft line of eye shadow colour on the lower lashline. They are also ideal for adding eyeshadow to the outer-v .

7.Eyeliner Brush :


This brush har sharp soft tip which 
ensures precise, clean application of eye liner.This type of brushes are excellent for applying liquid or gel eye liner.

8.Mascara Fan Brush :


This type of brush provides clump-free, precise mascara application to the upper and lower lashes.


Thursday, February 9, 2012

Boots Cucumber Facial Wash Review

Boots Cucumber Facial Wash Review


I love to experience products.Here's my new face wash Boots Cucumber Facial Wash.


Price : 255 tk for 100 ml.Available almas,meena bazar(  i saw this product in meena bazar for 280 tk,i made my purchase from ALMAS) etc.


What the product claims :


Boots Cucumber Facial Wash with Vitamin, enriched for radiant skin. It suits all skin types.


Ingredients : i am sorry here.There was chinese language behind the packaging.I couldn't find out the ingredients in english.


Direction of use : Squeeze a small amount of Facial wash into the palm of your hand and work into a lather with warm water. Massage over the face and neck. Rinse and pat face dry with a soft towel.


This is how the packaging looks :


This is how the face wash looks.kind of cucumber color :


Pros of the product :


- A little amount is enoufh for washing the face.
-hygeininc packaging.
-nice colour like cucumber.
-nice cucumber smell.
-i think it will suit all skin type.
-after wash skin doesn't feel fry & patchy.
-skin feels soft & fresh.I feel i am gonna buy it for summer.
-lathers well.
-Combination skin beauties can use this.
-do not cause any breakouts.
-do not leave a soapy slippery feelings.


Cons of the product :


-not easily available except those big supershops.


Am i buying it again??
yes,but would like to taste more variety.


Am i suggesting it??
yes, try this out.Its a good purchase.

Tuesday, January 31, 2012

How to contour Nose

How to contour Nose


Makeup is not only limitted in sequential application.The makeup beauty also lies in shaping up the face.Shaping face or contouring is a tricky part of applying makeup,just a lit bit of practice can help to give a nice full look.


Why you need contouring ??


-To shape up nose,like wide nose will look thin.


Things needed : 
                         1. darker shade of foundation
                         2.lighter shade of foundation ( this is the foundation colour you are gonna use for rest of the face's base makeup)
                         3.darker shade of pressed powder.
                         4.lighter shade of pressed powder( this is the face powder you will apply all over the face)
                         5.A angled makeup brush.
                         6.Makeup sponge
                         or 
you can buy Contouring kit which contain different types of cream foundation in a kit.In bangladesh its not available ,you will have to contour by foundation.


How to slim down a wide nose / contouring nose :


1. the basic principle of this use a lighter shade foundation on the bridge of your nose & darker shades on the side of the bridge of your nose.


2. see the picture :


3.Begin by applying the darker shade of foundation on either side of the bridge of your nose with the makeup brush.


4.Using the makeup brush, extend down each side of your nose, starting from the eyebrow and ending at the side of the nostril.


5.Create a line of dark color down each side of your nose. Blend outward towards your cheek, under the eye, and around your nostril to make it look as natural as possible.


6.Apply a thin line of the lighter shade of foundation down the bridge of your nose with the makeup brush. Begin between your eyebrows and extend all the way down to the tip of your nose.

7.Softly brush the lighter color towards the contoured, darker sides of your nose to prevent any sharp lines. However, be careful not to lighten the contoured areas.

8.The bridge of your nose is the area that gets hit by light first, and, therefore, applying a lighter shade of foundation will draw attention to the slimmer part of your nose.

9.Apply the darker face powder to give smooth finish.

10.Then apply the lighter pressed powder all over the face leaving lines of contoured area.

11.Use a brush to match down the dark & light matching lines of makeup.

12.Blending is the key.Blend untill you get a smooth & natural finish.


Monday, January 30, 2012

All about foundation : How To Apply Liquid Foundation - Part 3

All about foundation : How To Apply Liquid Foundation - Part 3


A perfect & smooth base is very much needed for a flawless make up. Take a good amount of time for applying foundation.Make your base perfect otherwise your rest of the makeup will be a mess. 


How to apply liquid foundation : 


Things needed : foam/Sponge or a dense,flat top brush( i use Sigma F80), tissue,liquid foundation.


How to :( by sponge)


1.clean your face well & apply a good moisturizer.( use johnson baby cream a very good moisturizing base for makeup).You can also apply sunblock/suncreen for a day makeup over it.


2.First caution,do not use fingers for foundation application if you are not expert enough.This is the mistake most woman make & they got a uneven finish of foundation.


3.take a makeup sponge.Like this


You may also find sponges of other shapes & sizes,suit yourself with the right sponge.


4.Before applying foundation , slightly damp the sponge by water.


5.Take a little amount on your finger.Put little little dots on all over the face.Like this 


(please do not try to blend by finger).


6.Take the dammped sponge & start blending in a motion ( like horizontally outward or horizontally inward motion, from cheek to ear or from ear to cheek).Use the sponge for blending like this 


7.First blend the nose area vertically.& then the cheek area.Last blend the chin & forehead areas.See the picture below.The picture best describe the right motion of application.


8.For the finishing touch , blend the foundation around the eye area,& the edge area of your face.


9.Take a tissue, press it on face very carefully & soak out the excess foundation.


How to apply liquid foundation ( by brush) :


1.Use a flat topped densed brush for foundation application.


2.Like this 


3.take a small amount of foundation on your wrist & lightly dip the brush in it.


4.Now pat the brush on face starting from your cheeks.


5.Here the best way of application is in a circular motion.


6.Move bristles of brush all over face untill you get a smooth & even finish.


7.The best benefit of this method is , after application there wont be any excess foundation on face.


There's also a 2 sided flat foundation brush like this


This is how it is used ( i do not prefer this brush as this type of brush can't give a smooth finish):


How to use Foundation Brush :


-Pour a small amount of foundation on the hand.
-Dip the brush the tip in the foundation.
-Make some dots of foundation on face.
-Now use the side of the brush to blend the foundation.
-Use broad, downward strokes to sweep and blend the makeup onto the nose, forehead, cheeks and chin.


Some additional tips :

-the tutorials are given based on internet & personal experience.This is the ways most women feel suitable for foundation application.But every person has a different way of comfort.Its better , find your own way of application.Choose brush or sponge which gives a perfect finish.

-While applying foundation,find your own way of starting.Its not mandatory to start from nose area.Its the basic & most common way of foundation appplication.

-Do not forget to apply pressed powder over liquid foundation.

-Not to forget other beauty essentials like lipcolor eye makeup etc.

-Liquid foundation finish will definitely alter skin color.It is its property.You will never get a perfect matching skin colour with liquid foundation,especially for medium skin tonned girls.So application of other makeup essentials is necessary when you apply a liquid fioundation.For fair skinned ladies like blondes , sometimes pressed powder is not necessary.But for Bangladeshi girls skin tone ,pressed powder finish is very much necessary.

-Dont worry about foundation color.As i mentioned in previous post , chooose the one which best tends to your skin.

Liquid foundation is the most common & widely used.Hope i have covered all the info s here.take care <3

Sunday, January 29, 2012

Some Effective Homemade Hair Mask recipes

Some Effective Homemade Hair Mask recipes


Homemade hair mask is the only thing i trust for my hair.Those who have weak hair roots,should go for homemade hair mask,avoid chemicals for hair as much as possible.


Here are some homemade hair masks recipes.Easy to made & harmless.


1.Yogurt(টক দই) & Egg white Hair mask :


This mask is widely used by women around the world.Egg white is the source of protien for hair root,whereas yogurt clear off dandruff,a great natural hair conditioner.


Ingredients : egg white ( for oily hair ),egg with the yolk ( for dry hair),A cup of yogurt.


How to : Mix the ingredients together.Beat the egg properly.Separate hair strands part by part,apply the mask all over your scalp & hair.Keep the mask for 30 to 40 minutes & then wash off by a shampoo (herbal shampoo).


2.Yogurt (টক দই),Honey & Tea liquor Hair Mask :


Here you should not mix egg with yogurt,egg & honey cant go well on hair.


Ingredients: 1/2 cup yogurt,1/2 cup tea liquor,3 table spoon honey.


How to :  Mix them altogether.Blend them for a fine mixture.The mixture would be runny , dont worry for it.Separate hair strands part by part,apply the mask all over your scalp & hair.Keep the mask for 30 to 40 minutes & then wash off by an shampoo,Use any tropical flavoured like coconut flavoured shampoo like (Suave coconut shampoo).Avoid using conditiner here.After washing hair pour fresh cold tea liquer on wet hair & dry up hair by towel.


3.Banana,honey,almond (বাদাম)& almond oil hair mask :


This hair mask is very good for dry scalp.Suitable for oily scalp too in winter.This hair mask is a good remedy for hair fall.


Ingredients : 1/2 of ripe banana,2 table spoon honey,4 or 5 almond grinded,almond oil.


How to : Mash the banana & mix all the items together.Apply on hair roots & hair strands.Keep it for 1 hour.Wash off & (additional : use any fruit flavoured shampoo ( like farmasi cherry flavoured shampoo)).Do not use conditioner as mask itself is a good source of protien & hair oil.


4.Coconut milk,Coconut oil & amla(আমলকী) Hair mask :


I love this hair mask .This mask suitable for all hair type.This mask is a great source of vitamin C.


Ingredients : 2 or 3 amla,1/4 coconut oil,1/2 cup coconut milk.


How to : Grate coconut finely.Keep them wet in water.After  2 or 3 hours rinse the grated coconuts & get coconut milk.Now take grated amla.Boil the finely grated amla in coconut oil for 10 minutes on stove.Now let the mixture cool down.mix the coconut milk with it.Apply it on hair & roots.Keep it overnight for best result.In the morning wash hair ( By any amla hair shampoo like vatika amla hair shampoo).


5.Neem,Henna(মেহেদি) & Tea liquor  Hair Mask :


This hair mask give a natural shine to the hair.This hair mask also helps to remove head lice.Neem works as an antidotes for head lice.


Ingredients :1 : 1 sundry neem powder & henna powder & Tea liquor.


How to : Sun dry some neem leaves.Make a powder from them.Do the same for henna leaves too.( you can also buy aarong's henna powder ).Mix tea liquor to make a paste.Put the mask on hair for 1 hour.Wash your hair by shampoo ( use a mild shampoo like Himalaya neem shampoo).


Saturday, January 21, 2012

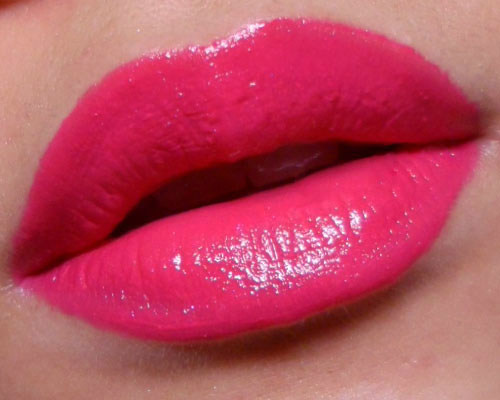
New spring trend Fuchsia Lipcolor : How to wear Fuchsia Lips??Difference between fuchsia & hot pink

New spring trend : Fuchsia Lipcolor : How to wear Fuchsia & Pink Lipcolor??Difference between fuchsia & hot pink


In the upcoming spring Fuchsia lipcolor is going to a big trend. Applying this lipcolor isnt as tricky as red lipcolor,but wrong wearing can ruin the whole look.Some mix up fuchsia with hot pink colour,but they are not same one.Fuchsia is more purple based and hot pink is more pink.Heres 2 pictures 1.Fuchsia 2.Hot pink


See pink & fuchsia enhances beauty of every skin colour :


-First keep your makeup simple. Especially when you are wearing this with a daytime look.


-Along the same lines, be sure not to overdo it with the blush. Too much pink on your face isn’t going to be a good look for anyone! If you do wear blush, try selecting a nude color.


-Do not wear bright pink blush with this color,wear peach or brown based blush with this lipcolor.


-Between fuchsia & hot pink.Fuchsia goes great with a day look.Hot pink goes great with a night look.


- Black, white, dark navy blue clothes.Do not wear hot pink,bright yellow or orange,brick red clothes with fuchsia or hot pink,if you have dark skin then never wear bright  hot pink with this lipcolor.


-Wear brown or baby pink eyeshadow with brown or black liner & mascara.Do not use blue or green shades on eyes.Do not wear shimmer on eyes.But you can highlight the eyes if you are on for a night look.


-Avoid coloured eyeliner & mascara.


-In overall makeup try to avoid shimmer.


-For an emo look use black using kohl pencil on eyes.Do not overdo.


-Brown based smokey eyes loook good with this colour.


-For funky look,wear beaded jewelleries,bangles with this color.You can glam yourself up with pink purse too.


-For an elegant night look,wear this lipcolor with black.Do not wear excess gold.


-You can wear baby pink clothes with this lip color.


Heres a picture of rihanna.This makeup with fuchsia lipcolor perfect for day look :


Heres a picture of kim kardashian ,perfect makeup with fuchsia lipcolor for an elegant night look -


Here's my Pink Lipcolor look 


Friday, January 6, 2012

How to do hair spa at home

                                         How to do HAIR SPA at home 

With every second person worried for dryhair, hair fall and thin hair, hair spa is more essential than ever. Hair spa twice a month not only  nourishes the hair but also enriches them, making them stronger, helps in regaining the shine and the length. Since everyone of us are pressed for time and taking out time to visit a salon is not possible all the time, we can make a hair spa routine at home.

How many times should i do hair spa in a month??

Here you can do this twice or thrice in a month depending on your daily routine & stress.If you have to go out alot for work on daily basis then do this home spa treatment twice or thrice in a month,you can do it even once in a week when you are on a busy schedule.If you are not on busy schedule,hair is not facing pollution ,dust etc,then do this treatment twice in a month.

Should i use natural hair care ingredients or company products ??

Here i would suggest to use them alternating one by one.If you are a bit free from daily work & routine sure go for home & natural ingredients.If you are on a busy schedule then go for company products.In a monthly basis,If you are doing twice in a month,then use natural ingredients first,then when next time you are doing hair spa,go for company products.

What are the steps of hair spa :
1.Oil massage
2.Shampooing by a mild shampoo
3.Hair mask
4.Washing again by a mild shampoo
5.Deep conditioning.
6.Hot towel or steaming hair
7.Shampooing 
8.Conditioning ( of the range of same shampoo mentioned in no.6)


If you are using a hair spa kit or chemical deep conditioners then follow steps -1,7,8 & then step no - 5.If your kit contains hair serum,then after the deep conditioning ,use the hair serum on towel dry hair & you are done with hair spa treatment.


Those who are using natural ingredients for hair spa,follow steps -1 to 8 one by one.

1.Oil massage :


Ingredints : 1/2 cup extra virgin olive oil, 1 table spoon almond oil( Well's almond oil very good, fragrance free & available at all good stores),1 table spoon coconut milk( wet grated coconut & press & rinse well for getting coconut milk).Many suggestions will tell you to warm the oil mixture.But when you warm oil like extra virgin olive oil & almond oil,you actually destroy the good ingredients.(use warm coconut oil for daily hair care ,not for spa treatment ).

How to : Massage your scalp with this oil mixture. Do not massage too hard since it will do more bad than any good and will result in hair fall. Oil massage with finger tip softly is the best way since it helps in improving the blood circulation in the hair follicles.keep the oil on hair for 30 mins.As its a spa you need relaxations,tune up your favourite slow music.Another way of relaxing is ,put a cool face mask on face ,put 2 cucumber on eyes,listen your fav beats & relax.


2.Shampooing by a mild shampoo:

Ingredients : Johnson baby shampoo,or any herbal shampoo ( a herbal shampoo i prefer available @ AARONG ,another one i also liked MEENA herbal's AMLA shampoo)

How to : Mix the shampoo in a good amount of water,make enough bubbles.Now shampoo your hair,so that all of your hair will become perfectly oil free.Now leave the hair open to dry partially , and go for step 3.

3.Hair mask :

This step is different for types of hair.You can check out other hair mask recipes & suit yourself with them.Here is the step of using company products.You can use hair mask or cream products in this step like dove hair mask or loreal cream bath.I am giving some well known hair mask or cream products


Here i want to say that ,you may find many instructions behind the pack of your hair mask.Just follow the following steps of this post after applying the hair mask.Keep the hair mask remain on your hair as the company saying .
Heres some other natural hair mask you can go for ( i like this way ,the natural one) .

Some natural hair mask recipes are :


Dry and frizzy
Dry hair can be treated well using a banana hair pack. Mash a banana and mix with it one tablespoon (tbsp) honey and one tbsp lime juice. Mix everything together till you get a creamy texture.Apply the paste on to your hair, especially focusing on the roots.

Damaged and abused
For hair that is really unhealthy and been through too many hot iron pressings, make a pack that will soothe and cool the scalp.In a bowl, mix two egg yolks with one egg white, juice of one lemon and a few drops of honey. Make a paste and apply it  on the hair. Leave it on for half an hour.

Oily and greasy
Take an egg white and apply evenly to your hair, without mixing it with anything else. Leave it till for 30 mins.


The following recipes are for all ( they are mild and yet helpful ) :

Egg and Oil Hair Mask

Make a well beaten mixture of 2 eggs and 6 spoonfuls of coconut oil. Whisk it thoroughly to get a smooth mixture. Apply this mixture on scalp with the help of fingers. The heat produced by the friction of fingers while massaging would help the oil penetrate deep into the scalp thus, nourishing the hair.

Banana and Milk Hair Mask

Mix one mashed banana with one beaten egg, 2 tablespoons of honey, 3 tablespoons of milk and 5 tablespoons of olive oil. Mix all together thoroughly to get a smooth mixture. Apply it evenly all over the head ..


4.Washing again by a mild shampoo :


Now on a average of 30 to 45 mins later after applying hair mask ,rinse off by using baby or mild shampoo as i said in the step no.2.


5.Deep conditioning :

This step is for dry hair,damaged hair,rebounded permed or curled & coloured hair.If yours hair is excessively oily & healthy enough,you should skip this step.


How to : Apply the deep conditioner on hair by separating hair parts & parts.Do not apply the conditioner on root.The excessive chemicals might harm .Keep conditioners 1 inch away from hair root.Keep the conditioner on hair for 20 mins & then wrap your hair  by hot towel as mentioned in no.6.


heres a short note about why you need deep conditioning : All the hair strands have three layers; deep conditioning affects the outer layer of the hair which is called cuticle. When hair becomes dry and frizzy this outer layer tends to get apart from the other two layers. Deep conditioning helps to join the cuticle to the hair shaft and give a smooth and shiny look to the hair. It can add strength to your hair until they grow and are long enough to cut off. If you are looking for a deep conditioner, learn to read the labels properly. If a label says that leave the product for 5 minutes in the hair then it is not a deep conditioner. Look out for products which says that a plastic wrap should be used on it while it is working and the product should be left on the hair for more than 10 minutes to anywhere for 20-25 minutes depending on the severity of damage.


Heres some deep conditioners :


If your hair is free from colour & any chemical, healthy  then you should go for natural ones :

Mayonnaise and Honey Hair Mask as Deep Conditioner :

Take half a cup of mayonnaise and mix it well with two tablespoons of honey & 3 table spoon of olive oil. Use a blender to whip it into a smooth cream like form. Apply generously all over the hair , but not on the root.


6.Hot towel or steaming hair :

After applying conditioner you need to wrap your hair by warm towel for steaming hair.


How to : Dip a cotton cloth or a towel in warm water and squeeze it to remove excess water. Now wrap it around the hair for about 15 minutes. You can repeat this after the cloth cools down.Use just warm water not hot water.

7.Shampooing :

Shampoo your hair now not by a mild shampoo.Here use good protien & vitamin rich shampoo like dove,pantene,sunsilk or hollywood style.


8.Conditioning :

Here use the following conditioner of your shampoo 's range .


Now you are done with your home hair spa treatment .
some additional tips :

1.let anyone else to oil massage your scalp.
2.Do not mix vitamin e cap with oil.(the vitamins wont penetrate in your hair root in this short time )
3.As mild shampoo i prefer johnson baby shampoo,as this process requires shampooing for 3 times.Excess shampooing can cause dryness.
4.I do not like to deep conditioning by chemical products.Use the mayonnaise as deep conditioner.
5.Relax all the time.


Hope you will enjoy your very own home hair spa.<3